Hall of Shame

Clockmaker’s Hall of shame
Proof That training and Skills Matter
Because antique clock collecting is such a wonderful hobby, many clock collectors will attempt to repair their own clocks. If they have any success at all they may soon be receiving clocks for repair from their friends, and then friends of their friends. It doesn’t take long before some of these folks begin to think they are qualified to perform clock repair for the public. Take it from us, reviving an old non-functioning clock is very rewarding. I fully understand what drives people who are passionate about clock collecting into the hobby of clock repair. Unfortunately, for far too many, they do not have sufficient skills or experience to provide proper repair to the general public for a fee. Because of this, the clock repair trade probably has the largest percentage of untrained, unqualified people of any professional field.
The photos that follow will document the large skills gap among those who practice the clock repair trade today and are proof that improper repair work is still alive and well all over the world and right here in Central-Ohio. All of the photos you are about to see are of clocks that came into our shop and were in need of proper repair work. But before we get to the actual photos let’s take a brief look at what the traditional path used to be to become a qualified professional clockmaker.

The Importance of the Apprenticeship System for clockmakers
A Brief History
Early in the 1700’s skilled clockmakers immigrated to New England from Britain. These clockmakers brought the eighteenth-century British apprenticeship system with them. They soon advertised for “smart young lads” to become apprentices.
The parents of young apprentices were required to pay about 25% of a year’s income in order to enter their child into an apprenticeship so that they could learn all the secrets of the trade. (A far cry from today, when everything is splashed onto YouTube for free, often by people of less than adequate skill.) It was not unusual for these apprentices to be required to chop wood, sweep floors and perform other menial tasks for the clockmaker. Once an apprentice was fully trained and established in a city or town, under the British apprenticeship system, that city or town would not allow an excess of clockmakers the “freedom” to practice their trade. The same system protected the public by assuring them that they would obtain a quality clock made by a properly trained clockmaker.
After the Revolutionary War, when Americans won their freedom from the British, it was understood that there would no longer be any restrictions for individuals to practice their trade, whether properly trained or not. The clockmaker with no skills would be allowed to fail if his products were not of sufficient quality and there was no longer any system to protect the consumer from poor workmanship. With this new “freedom” it was also possible for unscrupulous clockmakers to take on multiple apprentices that would be taught only smaller portions of the larger task, preventing them from ever learning all the secrets of the trade.
There were a few cities that established clockmakers’ guilds to protect the trade, but they had little power to enforce restrictions on those who did not join.
For further reading on this rich topic, the reader is encouraged to explore Tom Spittler’s book “American Clocks, An Introduction”, to which I am indebted for my synopsis of the traditional apprentice’s journey.
From this brief history we can learn that there was a great respect for the skill of clockmaking and a significant effort was made to guard and protect these highly specialized skills from abuse. Admittedly, in our modern era, it is quite difficult for those interested in learning the trade to find a qualified clockmaker who is also willing to take on an apprentice. Taking on an apprentice often means the clockmaker loses a portion of his income since they are spending some of their time teaching and not repairing. If the apprentice does not stay with the teacher long enough for the apprentice to produce work of their own, the clockmaker never has a chance to recoup his or her losses.
There are many advantages to an apprenticeship over other forms of learning. A typical apprenticeship would last 5 to 7 years. During this extended training period, the apprentice would be able to repair hundreds and hundreds of clocks under the watchful eye of the “master”. This keeps the apprentice from developing bad habits as the clockmaker is able to correct the apprentice when the work is done improperly and offer praise when the work is done correctly. During Michael’s apprenticeship he was able to complete approximately 2500 repairs. Vastly different from the person who reads a book, watches a video, takes a class or two and then opens up a shop with only a dozen or so repairs completed. Because there is no licensing required by any state that I am aware of, there are no requirements that need to be met in order to open a clock repair business and therefore no protections for the public against bad repair work. Unfortunately, too many people today, establish a clock repair business without giving the trade the respect it deserves. It is not reasonable to think that you can develop the skills necessary to become a proficient clockmaker in a few months or even years when others before them have invested decades, and sometimes their entire adult lives, to do the same thing.

Before we move on, let’s learn how clocks work and how they wear out.
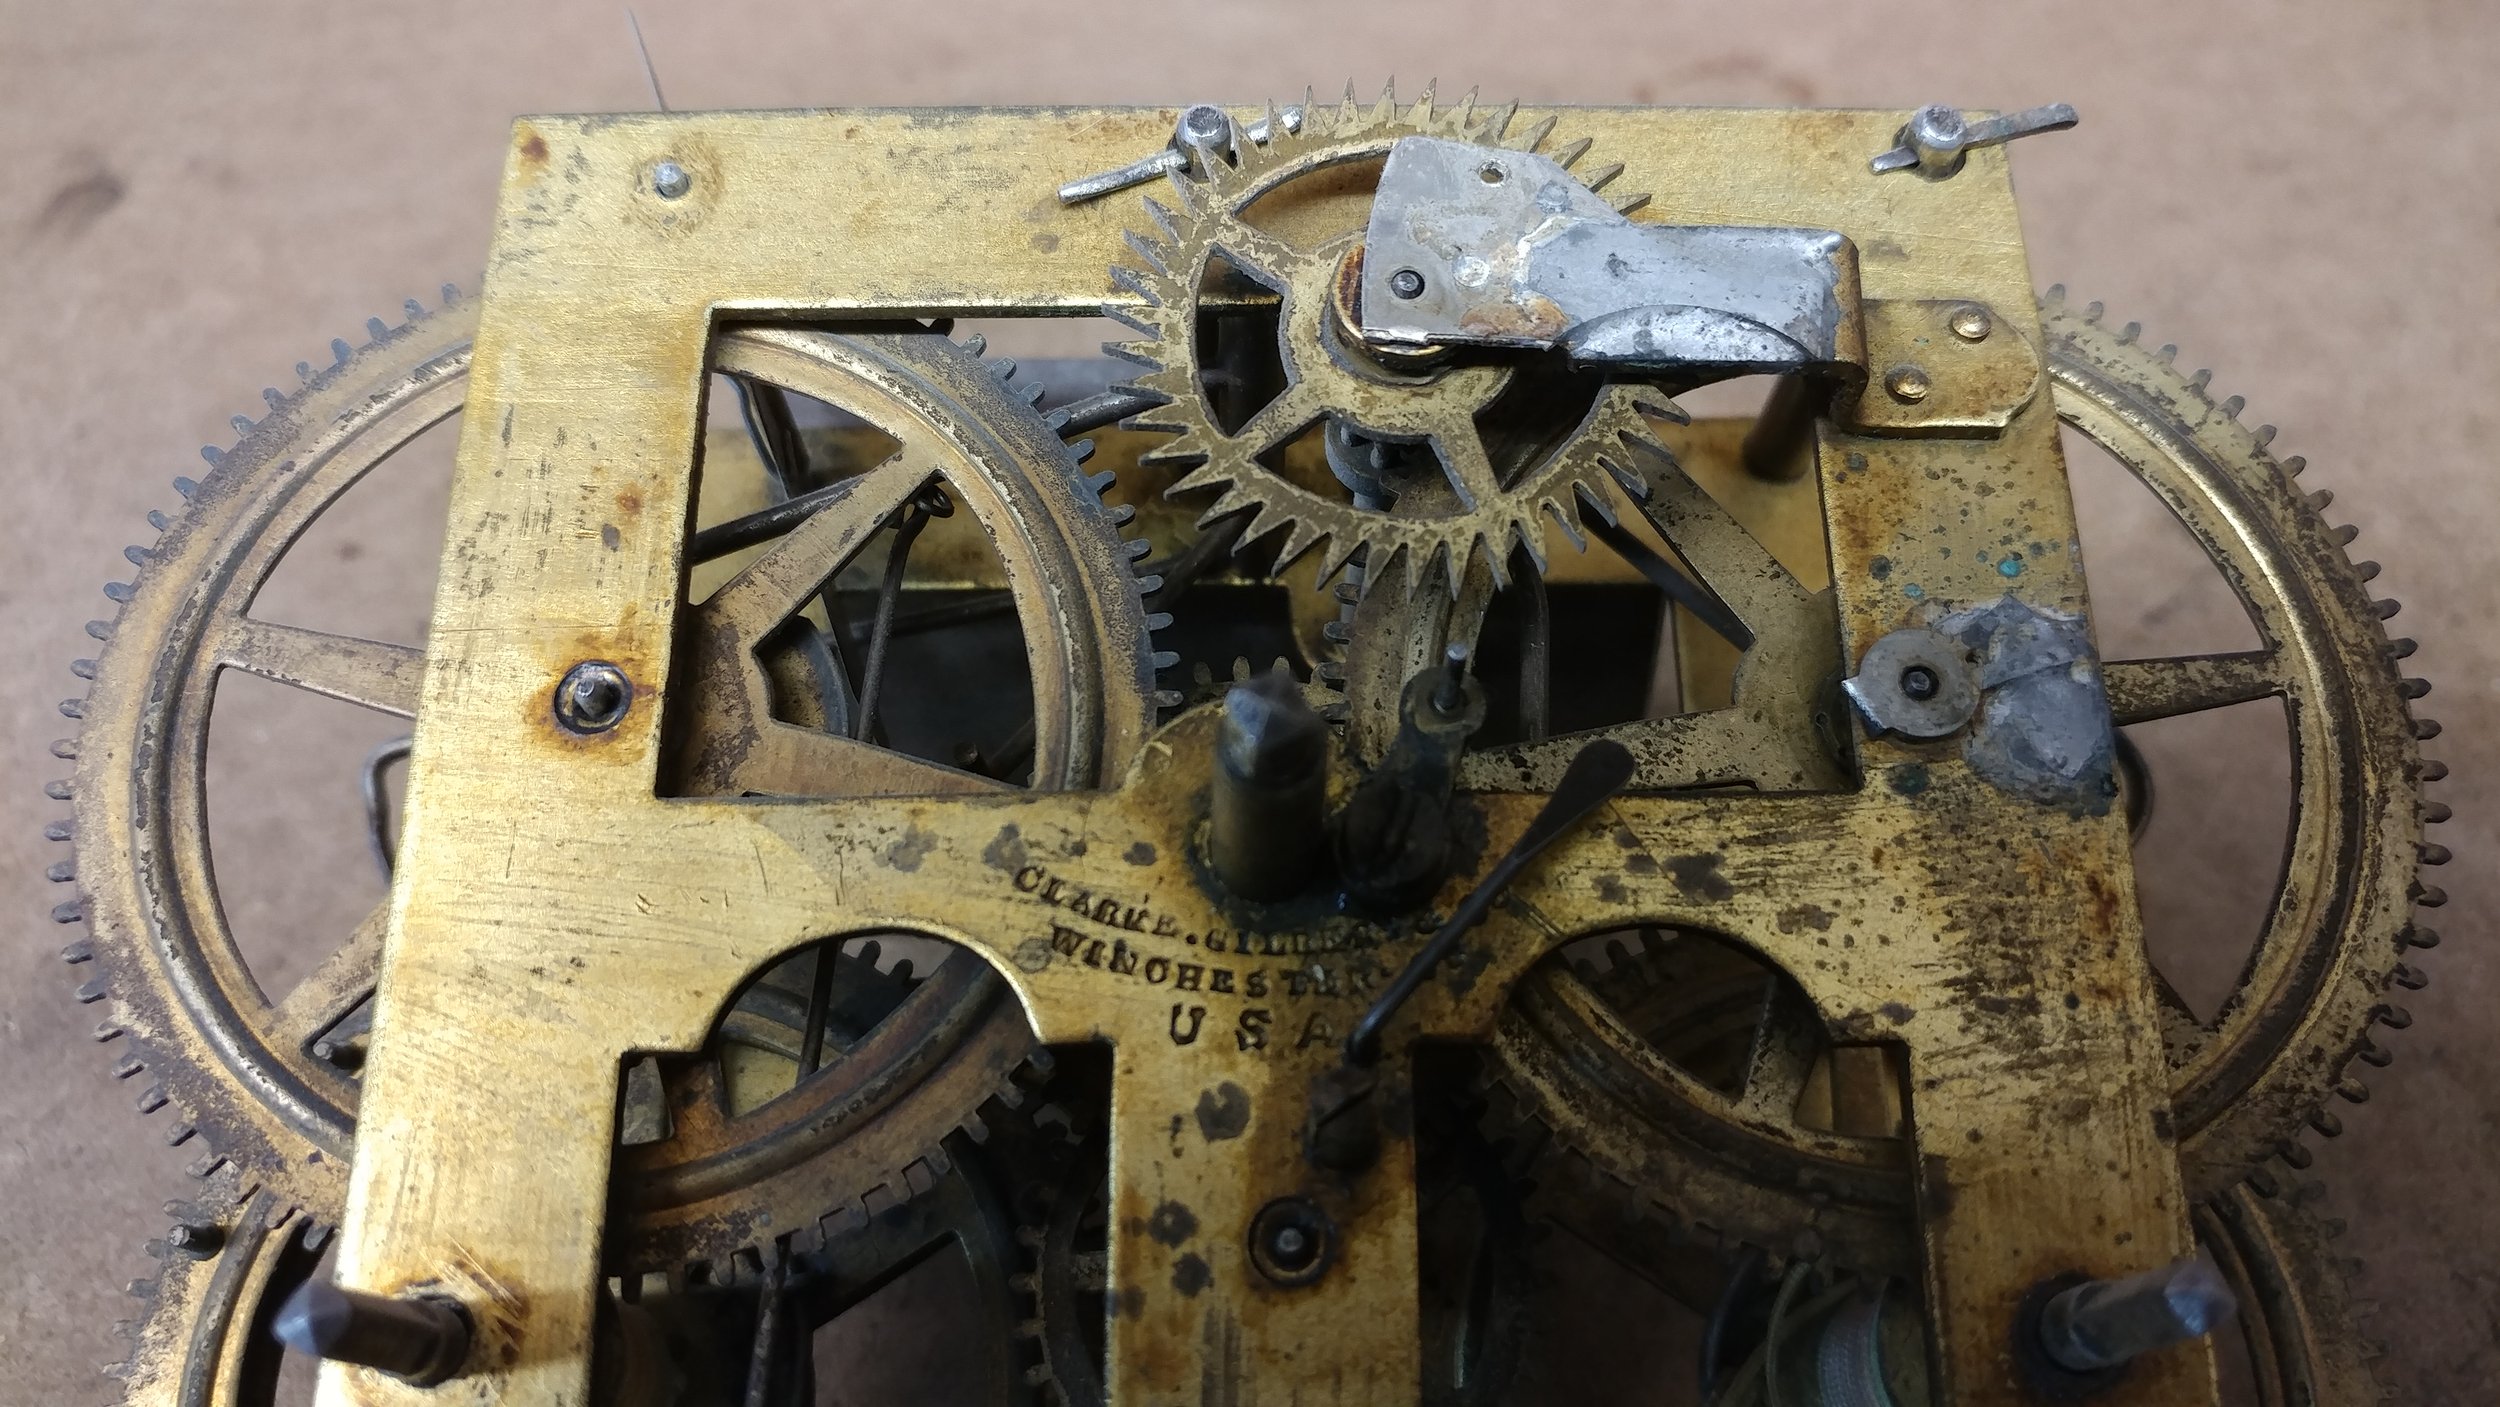
Clocks are made up of many gears and levers “sandwiched” between two brass plates. (See photo below on left) In the brass plates are drilled the holes or bearing surfaces in which the gearing rotates. A wheel is mounted on an arbor and the very ends of the arbors where the diameter is reduced are called pivots. (See drawing of a typical gear below middle) The pivot turns in the bearing hole when the clock is operating. The friction caused by the harder rotating steel pivot inside the softer brass bearing surface causes the bearing hole to enlarge. This is called “bearing wear”. As the pivot, arbor and wheel tilt in the direction of the wear, the mesh of wheel to pinion changes in a way that does not allow for a smooth transition of power and causes the clock to fail.
the left side of the photo at bottom right shows a worn/oblong hole. The right side of the same photo shows this same bearing hole, repaired with a properly installed bushing. You can see that the hole is now round again.


Examples of Severe Wear
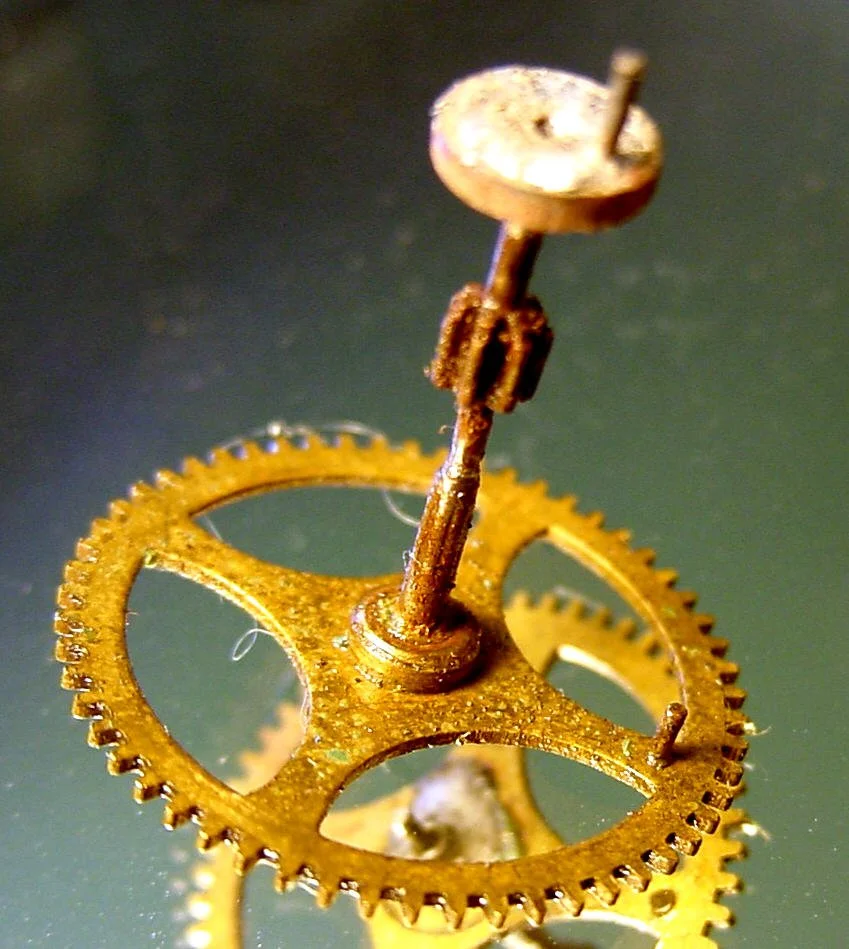
Looking at the very center of each of the photos below, you can see the very “off-center” harder steel pivot, inside the once perfectly round, but now severely worn, oblong hole in the softer brass plate.


Shameful Wear Repair
As just discussed, most machines, by definition, have moving metal parts. As these moving metal parts are rotating in load bearing surfaces, they begin to wear over time. This is why almost all machines require periodic maintenance and re-lubrication. All machines will tolerate a certain amount of wear, but at some point, the wear will get so bad, that the machine will cease to operate. Clocks certainly fall into this same category.
For this reason, one of the most common repairs that clock repair people will perform, is the repair of worn bearing surfaces. You are about to see “the good, the bad and the ugly”, We will begin with the poor quality “Bad and ugly” repairs, then we will show you “the good”, what it looks like when it is done correctly.
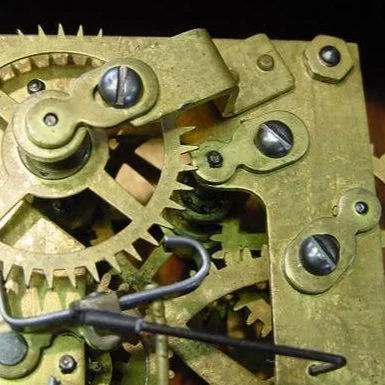
Prick Punching
Remembering what we discussed earlier, the steel pivot wears the bearing hole “out of round” causing a shift in the gearing. In an attempt to “move” the pivot back to its original location some clockmakers actually take a hammer and a punch and beat the clock with it! These marks around the steel pivot show the abuse that occurs when this poor work is performed on a clock. If you look closely at the two photos center and right, you can see that the punch even hit the edges of the pivot itself distorting and damaging the once round pivot.


It doesn’t take a clockmaker to see that this is not appropriate work to perform on anyone’s clock
Rathbun bushings
These “beauties” on the left and the right, are politely called “Rathbun” Bushings or “band-aid” bushings. They take advantage of the long pivots on early American Antique clocks that protrude well beyond the plate surface.
By placing the small hole over the pivot, they can move the pivot back to its proper position, and then screw the “band-aid” down to hold it there.
Unfortunately, the application of these “bushings” de-face the antique clock plates.

“Screw-In Bushings”
On the left is what is called a “screw-in” bushing. a special tool is used to cut a hole around the pivot without disassembling the clock. When the hole is cut, the hole is then threaded to receive the bushing. A tool that fits into the three small black marks is used to screw the bushing down and over the pivot. The big problem here, other than the oversized bushing, is that when a hole wears, the pivot becomes scarred as well. When you do not take a clock apart you are unable to restore the pivot’s finish, which is important to reduce friction and further wear.

Soldered on Pieces of Brass
This example of poor workmanship does not even do the clock the courtesy of using a pre-made Rathbun bushing. The person simply cut chunks of brass out, drilled a hole in them, and soldered them over the pivots.
the thing that is common to all these awful wear repair examples is that the “clock repair person” does not need to disassemble the clock. for far too many people, the thought of taking the movement down to its individual parts to perform the repair properly is too frightening to attempt, after all, it will have to be put back together! This takes both time and skill as well as the know how to place the parts in the correct places and synchronize the gear trains.

What Wear Repair Should Look Like!

Restored Herschede Tubular Bell Clock Movement
It may not look like it, but every bearing surface on the back plate of this clock has been repaired with a bushing. Not a Rathbun bushing, not a screw-in bushing, and not soldered on pieces of brass. Certainly, no prick punching! We simply used pre-made bushings designed for the proper repair of wear in clocks. The fact that you cannot see the bushings is a testament to their proper use and installation. Around every little silver point (steel pivot) you see in the photo, is a neatly installed brass bushing that re-centered the pivot into its proper position. Even the much larger “silver points” on the lower half have a bushing around them.

Early American Ansonia Movement - Circa 1900
This is another example of a restored movement with the worn areas repaired correctly. Once again, every bearing surface has been repaired and re-sized to fit the pivots perfectly. It is difficult to see the repairs because we endeavor to perform our work properly, artfully and durably.
To learn more about what a restoration or an overhaul entails, please visit our “Clock Movement Restoration” page.
Abuse of Solder
Although clockmakers will avoid the use of solder when it is possible to effectuate a proper repair without it, sometimes solder is necessary. When a talented clockmaker uses solder, he will do so judiciously and with proper techniques. In all of the shameful examples below, you will see two things that are common. The first thing is using an excessive amount of solder. The second is not cleaning the area afterwards when flux is used. Flux is helpful in making the solder stick, but flux is also quite corrosive and will cause the steel parts to rust and even corrode over long periods of time.
Pallet Repair
On the left, is a poorly repaired set of pallets, one of the two parts that make up the escapement. The escapement is the part of the clock that pushes a pendulum back and forth and divides the passing of time into very small segments. The brass components must fit tight enough to the steel arbor to hold their position but not so tight that they cannot be adjusted. This is properly done through friction, not solder.
On the right, is the set of pallets after the old solder was cleaned off and rust removed from the steel arbor. The completed repair allows the crutch to slip on the arbor, but the pallets to hold tight.


Blobs of Solder!
Poorly Repaired Flywheel
On the right is what is called a flywheel. It is typically found in the chiming and or striking gear trains. The flywheel, also called a governor, is there to control the speed at which the clock chimes or strikes. The brass flywheel is not to be “permanently” fixed to the steel arbor but is meant to be able to slip when the gear train stops so as to prevent damage. Once again, you see an overuse of solder and the corrosive effects of neglecting to clean the flux from the piece. It was necessary for us to remove the solder, polish all the components and tighten the flywheel to the arbor using friction to hold it in place.

What was the point of this?
This is the rear plate of a grandfather clock movement made by Jauch. The dark “circle” in the very middle of the photo is a bearing surface where we should see a shiny steel pivot protruding. I have not been able to figure out the purpose of the solder, but one thing we know for sure is, it is UGLY! Why would someone do this to a clock?

Corroded Clock Movement
All the photos below are related to the same clock. The far left shows the entire front of an antique American mantel clock movement. Right away you can see that something isn’t right, blobs of solder, rust and corrosion. The middle photo is a close up, showing the poor repair work more clearly. It is apparent that someone broke the strike rack (the dark piece with teeth pointing diagonally, up and to the left) into several pieces during a misguided attempt to adjust it, and solder was used to re-connect the damaged pieces. What is amazing about this particularly awful repair is that it appears that they did the soldering, with the part still on the clock! The soldering of the strike rack alone is bad enough, but spreading flux and excessive heat onto the other clock parts is inexcusable. The photo at far right is one of the gears from the inside of the clock. You can clearly see the corrosion on the steel arbor and pinion. When we attempted to clean this, the part was so weakened that it snapped in half. We had to find and purchase a like movement to use as a donor as several of the parts could not be saved.


Unnecessary Marking of Movements

When repairing clocks, it is often necessary to make notes so once the clock is disassembled you can remember what you need to do to specific areas of the clock. These notes are usually made by making a quick and often crude drawing of the movement and making notes there. In these two instances the notes were made directly onto the clock movement. On the left you see a labeling of the various bearing surfaces, and the small lines are likely there to aid in the placement of bushings. On the right you see something similar, but the marks to aid in bushing placement, were scratched right into the plate, a permanent monument to ineptitude!

Bad lever Repair

This was a nice Seth Thomas #124 chime movement. Not sure what they were trying to accomplish here but anyone can see this isn’t right! Someone has added a chopped-up piece of a cuckoo clock music box lever on the left side of center, to the original lever on the right side with a combination of solder blobs and copper wire.
Bad lever Repair on a Very Expensive Clock

Although this repair is quite ugly, what makes it particularly egregious, is the fact that this late 1700’s era Dutch tall case clock was sold by a reputable, well known, antique store in a very large southern city. The clock was sold as a restored clock, a restoration performed by their clock repairman. The selling price? $50,000. That’s right, no typo here, $50,000! Indeed, for that price you would expect to be buying a clock that had been restored properly.
The photo below on the left shows the entire front of the clock movement. The photo on the right shows a close up of the same clock. Looking closely at the copper-colored lever you can see that the lever has been poorly repaired in three different places by a combination of poor solder and rivet work. There are much better ways to perform this repair. Either a new lever could have been formed from a blank piece of steel or the shims, solder and rivets could have been done in a much neater and stronger fashion.
You can also see that a brass “U” shaped shim has been soldered onto the southern pointing tip of the steel lever to the left of the copper colored one. This shim is engaging with the “saw-tooth” looking piece directly under it. There was obviously a need to extend this piece downwards and make it thicker due to 250 years of wear. But this is not the way to do it. They also should have used steel instead of the much softer brass which would likely wear away very quickly.

This clock stopped within hours of delivery and set up by their clock repairman who was flown to Columbus to set it up. Because the purchaser was one of my customers, the customer asked me to come look at it. There were quite a few issues with the clock, other than just the levers. I offered to repair the clock properly for the antique store, but they refused to pay me. The customer ended up sending it back, at their own expense, for a refund. What a shame.
Bad Barrel Teeth Repair
What you are looking at below is a barrel that houses the mainspring for a clock. Sometimes when a mainspring breaks, the force of the breaking mainspring will jolt the barrel with tremendous force, against the teeth of the gear next to it. This frequently results in the some of the teeth being sheared off. When those teeth go missing, this is not how you repair it!

On the left you can see, at the top, in the middle of the barrel, what are supposed to be repaired teeth. Someone drilled into the barrel and inserted two pins to make new “teeth”.
On the right you can see that those two pins were driven through the hole and are protruding into the inside of the barrel. This is where the mainspring goes!


Above, you can see three more egregious examples of poor teeth repair on mainspring barrels. on the far left a repair with a double row of pins and on the far right a horrible solder job attaching two teeth to a barrel. In the middle, it looks like a notch was cut out of the plate so that they could attempt a repair of damaged teeth (silver area) using what appears to be J. B. Weld! Also in the middle, the ugly copper colored “nut” was apparently an attempt to repair a damaged mainspring barrel catch.
Scroll down to see how it is done correctly!
Proper Barrel Teeth Repair
This is how we do it!


On the left, you can see that there are two teeth missing at the top center of the mainspring barrel. On the right you can see where we made slits in the barrel to receive the new tooth plugs.
On the lower left, you can barely see the new teeth inserted at the top center. The middle photo below shows a close up of the same area making it easier to see the repair. The photo at bottom right shows the barrel from a different angle. You have to look really closely, but the two teeth right in the middle are the repaired ones! You can barely see the faint rectangular outline from the tooth blanks.


If you would like to see more details about how this was done see our “The Art of Clock Repair” page.
The Bitter Taste of Poor-Quality Lasts Longer than the Sweetness of Low Price
Sometimes you pay a little and only get a little, value for value. Other times you pay a lot and still get very little. Unfortunately, everyone who does poor work does not necessarily charge small fees for their work.
As mentioned previously, there was a time when the “Art of Clockmaking” was somewhat mystical and revered. The knowledge and skills necessary were often trade secrets that were not just “given away” to any interested party. Obtaining proper training was difficult. In the early days of clockmaking, if you didn’t get proper training, you simply didn’t do the work for the public. The local clock guilds would be sure of that. In our modern times, where “everyone” is an “expert”, how can you tell if you are hiring a competent professional to repair your clock. Recently, one of our customers, who had a bad experience with an Ohio based clock repairman and was bringing their clock to us to see what we could do, handed us a card from the person who performed the repair. The card said, “clock repair specialist” and right next to it, it said “Hobbyist”. I am not sure you can be both of those things at the same time.
For those of us who work professionally and have spent five years or more in an apprenticeship program and or traveling around the United States taking various courses to hone our skills, it is understandable that we are unhappy to hear the stories from many of our customers about their bad experiences with some of these inadequately trained, but perhaps well-meaning individuals. Like any professional trade, it takes many, many years to gain the skill, knowledge and experience required to perform their jobs properly.
If you have had a less than ideal experience with a clock repair, you need a second opinion, or you are just looking for someone you can trust to give you an honest assessment and who can perform a proper restoration when it is called for, please email or give us a call. Click on the “Contact Us” link in the footer below.